Macbook Air (6,1) 2013 model with Ubuntu
vim and editing pandoc2rfc
… or any other document format for that matter.
I thought it might be nice to have some sort of split window view in that allows you to edit a Pandoc file on the left and see the generated I-D on the right (in vim, with no extra daemons and not relying on inotify).
Turns out you can do that, though it is not optimal, but it works. The jury is still out if this works well enough to actually make it useful.
Make GNOME3 usable
GNOME3 in the default install is unusable, not as bad as Unity, but bad. Luckily
with some minor tweaking it can be made to work quite nicely.
These are some assorted notes on how I got stuff working the way I like.
From a fresh Ubuntu install, install GNOME3:
sudo apt-get install gnome-desktop-environment
Then:
-
Normal focus mode:
gsettings set org.gnome.desktop.wm.preferences focus-mode 'sloppy' gsettings set org.gnome.desktop.wm.preferences auto-raise false -
Extensions:
Persistent Synaptic Touchpad settings in Ubuntu 12.10+
I was wondering how to make my touchpad settings permanent in Ubuntu. I could find a few pointers on the net, like:
But sometimes it makes sense to look at your own system’s documentation:
% cd /usr/share/X11/xorg.conf.d
% head 50-synaptics.conf
# Example xorg.conf.d snippet that assigns the touchpad driver
# to all touchpads. See xorg.conf.d(5) for more information on
# InputClass.
# DO NOT EDIT THIS FILE, your distribution will likely overwrite
# it when updating. Copy (and rename) this file into
# /etc/X11/xorg.conf.d first.
# Additional options may be added in the form of
#   Option "OptionName" "value"
#
Section "InputClass"
Which seems pretty obvious to me. I added
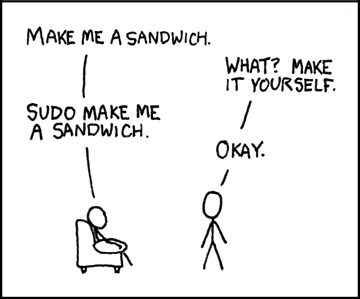
Make me a sandwich, MAKE me a sandwich
We all know this comic:

And now in zsh!
With the following snippet all commands that are started with an uppercase word
will be prefixed with sudo and then executed.
So MAKE me a sandwich, becomes sudo make me a sandwich.
accept-line() {
    local B
    B=(${=BUFFER})
    if [[ "$B[1]" != [A-Z]* ]]; then
        zle .accept-line
        return
    fi
    if [[ $B[1] != "" && $B[1] == $B[1]:u ]]; then
        BUFFER="sudo $B[1]:l $B[2,-1]"
    fi
    zle .accept-line
}
And activate with:
Vim as MANPAGER
I like Vim, so I try to use it at many places. Like in my shell (set -o vi), and
when writing and coding.
After some Googling I found that Vim can also be used as a MANPAGER. But there is
one nagging issue. To quit viewing the manual page you have to type ‘:q’, which is
one keystroke more then when using less as your MANPAGER… Needless to say: this
is unacceptable.
Dynamic Syntax Highlighting in Vim
I’m a huge fan of syntax highlighting in my editor Vim. One thing I started to
miss was that user defined type miss out on the highlighting, because Vim does
not know about them. Wouldn’t it be cool to have some sort of automatic support that
detect your types and adds them to the correct highlighting group? I call
this “dynamic syntax highlighting”.
As a proof-of-concept I took the tagbar
plugin, and modified it a little to take
advantage of the language detection (specifically the types). The modified code
can be found in my fork on github.
Updated DNS syntax file for VIM
When editing zone files with vim I always get annoyed by the fact that the syntax highlighting did not understand newer types ’n stuff. I never did anything about until now.
Download this vim syntax file and drop it
in ~/.vim/syntax. It adds newer (DNSSEC) types and base64 highlighting. Base64 only works
when there are no embedded spaces (patch welcome to fix that btw!)
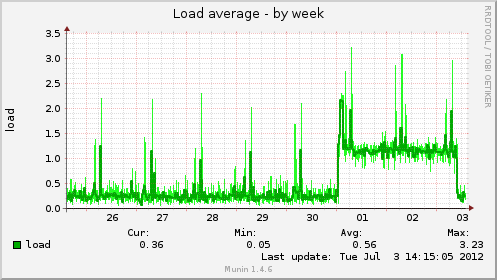
Leap second insertion at work
Puppetd (ruby) was going nuts.
Jul 1 01:59:59 elektron kernel: [183728.001601] Clock: inserting leap second 23:59:60 UTC
Results in:

Munin port traffic plugin
I wanted to look at the increase in ntp traffic now that I’ve
joined the pool.ntp.org ranks. Unfortunately munin didn’t
have a watch-port-x-and-draw-something-plugin. So I wrote my
own based upon the ip_ plugin.
The plugin monitors both v6, v4, tcp and udp and plots them together, as send and received. Just symlink the port number to the plugin:
ip_port_123 -> ip_port_
For it to work, you do need some iptables rules, so yes, this
plugin only works in Linux. See the
munin plugin
for the documentation.
ath9k under Linux
For some reason I was experiencing wifi disconnects with the ath9k wifi
driver under Linux (Ubuntu 12.04). After reading numerous blogs and bug
reports (disable ipv6, use hwcrypto=0, etc.), I suspected it was the
power management that was somehow disabling the driver, in turn leading
to a disconnect. This will probably be fixed in newer kernels (Ubuntu 12.04
ships 3.2.x).
For now I took a shortcut and disabled the power management
on the wlan0 interface. For this to work I created a (super)small
script: /etc/network/if-up.d/wifipower:
Convert vim colors to gvim colors
I’ve tweaked my vim color scheme quite a bit and tried to keep the colors of gvim (which I use less often) in sync.
This keeping in sync hasn’t worked out, so I wrote this little script to convert the vim colors to the gvim ones:
Download the makegvim script, and use it like:
$ ./makegvim < ~/.vim/colors/<yourfile> > /tmp/x
$ mv /tmp/x ~/.vim/colors/<yourfile>
And now the colors of gvim should be identical to those of vim.
Cherry-picking remote branches
I’ve create a little tool (actually an XSLT file) that helps to write RFCs. Browsing my github repo I found two different forks. And browsing those forks, I saw some commits I wanted to have.
But how do you merge a commit from a forked git repository? Turns out it is not that difficult.
The commit I want has the hash 5a11e88ddbef4ce7513aae93bdcd377449f45efb.
The steps:
-
Create a remote branch:
git remote add hamnis https://github.com/hamnis/pandoc2rfc -
Fetch the contents of it:
color me, color you
In the xoria256m post, I introduced my xoria256 like color scheme. Again, inspired by solarized, I extended this to other applications. So now I use this in the following apps:
- vim (see that previous post);
- mutt (idem);
- zsh;
- dircolors;
- git (a bit).
zsh
See this file to setup the colors. Then in my prompt I have stuff like:
PS1=$'${vcs_info_msg_0_}$FG[067]%(1j.$myjobs% $FX[reset].$FX[reset])$FG[179]%#$FX[reset] '
RPS1="$RPSL%$MAXMID<...<$mypath$RPSR$FG[239]$FX[bold]$__ZH$FX[reset]${vcs_info_msg_1_}"
RPSR=$'$FX[reset]$FG[009]%(0?.$FG[reset]. $E)$FX[reset]'
For zsh I have two files that make up my prompt:
Xoria256m color scheme
I recently came across solarized. I started to use it immediately for vim and mutt, but after a few days the low contrast of the color scheme started to annoy me. Oh and btw, I’m red/green color blind.
I went searching and found “xoria256” a color scheme suited for 256 color
terminal and a dark background. There is even a Ubuntu/Debian package
for it: vim-scripts. Unlike solarized it doesn’t come with a custom palette, just
use Tango in gnome-terminal (or whatever your favorite is).
Opposite of J
In VIM you can use the command J to join to lines:
hello       -> J ->  hello goodday
goodday
Where the cursor is positioned somewhere on the ‘hello’ line.
But I often find myself wanting to use the opposite, I want ‘hello’ to be put after ‘goodday’. The cursor is now positioned on the ‘goodday’ line.
hello
goodday    -> K -> goodday hello
The following mapping does that:
OpenSSH and Kerberos
[Personal note to self:]
I’m assuming LDAP en Kerberos completely setup and configured and working. You
get your TGT after a kinit, etc.
And then you want to utilize Kerberos to password-less login using ssh.
I have a client machine foton.atoom.net, from this machine you want to login
to the server.
The server is elektron.atoom.net.
On the client the command, hostname -f should return the fqdn of your host, in
my case:
GNOME 3.2 Wishlist
- Zeitgeist integration;
- Focus follows mouse working. As in ‘alt-tab’ obeys this too. See bug 597190;
- Easier workspace switching;
- Themes;
- Much smaller window titlebars;
- An easier way to find your windows, maybe a windowlist in the panel.
Stay out of my windows
It’s called a resize grip, you can’t disable it (seems to be a common theme nowadays…) and it sucks.
Stay the FUCK out of my windows with this crap!

OpenSSH 5.7 for Ubuntu 10.10
I need hardlink support in sftp and the newest ssh version provides this. But there are no packages
for Ubuntu 10.10. Therefor I backported OpenSSH from Ubuntu 11.04 to 10.10. Here you can find
these packages:
64 bit
- openssh-client_5.7p1-1ubuntu1_amd64.deb
- openssh-server_5.7p1-1ubuntu1_amd64.deb
- ssh-askpass-gnome_5.7p1-1ubuntu1_amd64.deb
- sshfs_2.2-1build1_amd64.deb
32 bit
- openssh-client_5.7p1-1ubuntu1_i386.deb
- openssh-server_5.7p1-1ubuntu1_i386.deb
- ssh-askpass-gnome_5.7p1-1ubuntu1_i386.deb
- sshfs_2.2-1build1_i386.deb
all
The minimum upgrade consists of installing openssh-client and openssh-server.
Hardlink support in sshfs
OpenSSH 5.7 adds hardlink support to the sftp protocol:
sftp(1)/sftp-server(8): add a protocol extension to support a hard link operation. It is available through the “ln” command in the client. The old “ln” behaviour of creating a symlink is available using its “-s” option or through the preexisting “symlink” command
This is awesome as I can use that to make rdup work (better) with sshfs.
I’ve created a patch to add hardlink support to sshfs. See below. I also created packages for ubuntu:
Bash Hate, Zsh Love
…Or why shell scripting is not really programming. Two scripts, one
called bash-hate:
#!/bin/bash
count=0
cat /dev/null -  | while read line; do
    ((count++))
done
echo $count
and the other one zsh-love:
#!/bin/zsh
count=0
cat /dev/null -  | while read line; do
    ((count++))
done
echo $count
Then:
% cat testfile | ./bash-hate
0

% cat testfile | ./zsh-love
9
(Yes, I know about subshells. Just learn a real programming language.)
Git, $Id$ and file names
It is already possible to use filters in Git. But embedding the current file name in the expanded string is somewhat harder.
You can do this by some edit wrapper which inserts the file name “at the right time”, but I think it is much more cleaner to do this in the git-filter script.
For Puppet I want system administrators to see from which directory in the Git repository the file came from, like so:
First post running Ubuntu 10.10
Well, the upgrade was easy enough, some weird LDAP database corruption
that was fixed easily by running db4.7_recover in /var/lib/ldap.
There is something fishy going on in /etc/nsswitch and using ‘files’
instead of compat. Got lots of segfaults:
[90474.491264] zsh[5668]: segfault at bfcf07ef ip 001be398 sp
bfce4efc error 6 in libnss_files-2.12.1.so[1bc000+a000]
Not enough for a bug report (yet), I still need to examine this further.
Fuzzy fonts in Chromium Browser Under Linux
I did a small upgrade to the newest version of Chromium and all of the sudden the fonts in the browser area were all blurry and fuzzy…
After some searching it turned out that WebKit (which Chromium uses for
the rendering) uses the settings from font-config instead of the whatever
you click inside your DE’s configuration tools.
% fc-match -v Arial | egrep 'family|hint'
family: "Arial"(s)
familylang: "en"(s)
hintstyle: 1(i)(w)			<- '1' means slight hinting
hinting: FcTrue(w)
autohint: FcFalse(s)
And to remedy the situation:
Hibernate and suspend with Ubuntu 9.10
I have an Asus EeePC on which I’ve installed Ubuntu 9.10. But now I wanted a working hibernate (suspend to disk) and suspend (suspend to memory).
Hibernate was working out of the box (well the going to sleep part, at least), but resuming took almost as long as a cold boot. Another thing was that my wireless was broken after a resume. On my happiness scale (range: 0-10) this scored a 3.
Ubuntu Lucid Alpha-3
I want to upgrade my server to the new Ubuntu and switch to 64 bit on my main server. This is how I managed to get Ubuntu Lucid (Alpha 3) running on my (test) machine, with RAID1 + BTRFS and 64 bit. It is a running story on how I spend my Saturday afternoon, you might need some decent Linux knowledge to follow my lead.
Here we go.
The following lists sums up my needs and troubles:
upstart and booting with init=/bin/bash
One of the oldest tricks in the sys admin’s arsenal is
booting with init=/bin/bash. You’ll need this when
you want to reset the password for root for instance.
It used to go like this: Boot with init=/bin/bash and
after some time you greeted with a prompt ala
root@(none):/#
Most often I then took the following steps:
mount -o rw,remount /
/etc/init.d/networking start
Now you also have networking, so you may upgrade the
system with apt-get or whatever… You are now a
happy puppy.
My f() function in Zsh (and maybe Bash)
Familiar with the following?
You are aware of (shell)file which contains a interesting line and you think: “I want to execute this line on the command prompt”. Most people will do the following:
% more <file>
[select interesting bit with your mouse]
[paste]<enter>
And the code gets executed.
I propose the following function: f(), which does the following:
- It opens the file in $EDITOR (:=
vimof course); - You delete everything you don’t want to execute;
- What’s left gets executed;
- And it is added to your shell’s history.
The code of the function looks like this: